
My journey into soap making started a few years ago when I discovered that my dry skin problems were much improved just by switching my soap! I used to love body washes, but they were drying out my skin so badly. Once I switched to all natural made soaps I was hooked. Making my own soap was so exciting and helped us to save a little money on store bought soaps.
This Homemade Soap Making 101 guide will help you get started on making your own handmade soaps!
I am also including one of my favorite recipes for handmade soap too.


Before making your first batch of soap you need to decide what kind of process you want to take to make it. There is a cold process and a hot process. Cold process soap is my preferred way of making soap because I get to control each ingredient from start to finish. It’s also the hardest process to master and so many people prefer the hot process method or melt and pour method.
There are basically three processes to make your own soap:
Don’t get too confused with the names hot and cold. All process will have a little heat involved.
- Hot process soap making uses lye and an external heat like a crockpot to speed everything up.
- Melt and pour soap making uses pre-made soap bases that you melt and add your own essential oils and other conditioners to. It’s the easiest you can make because the soap has already been processed and all you do is melt the base down and add what you want before pouring into your mold.
- Cold process soap making uses lye and does not use any external heat to speed up the process.
I suggest trying all the methods out to get a feel for what you like. The method I am using for this recipe is a cold process soap. Be sure to keep in mind that it will take 4 months minimum for the soap to finish the curing process with this method.
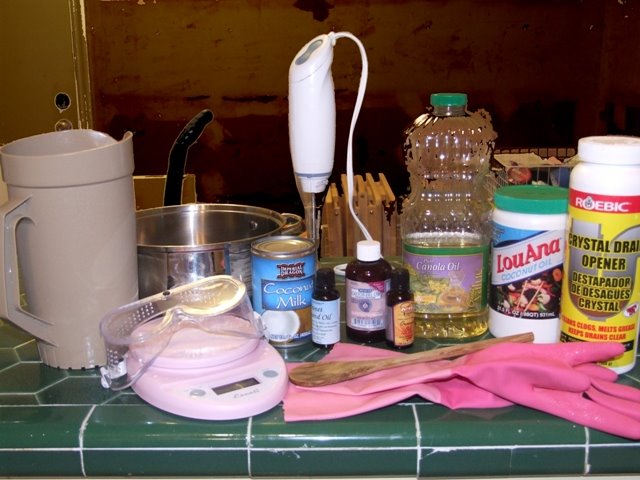

Here are all the tools to make your homemade soap… and yes that is crystal drain opener a.k.a. 100% lye- you can’t make soap without it! There are various recipes you can use, but this is a good one to get started with.
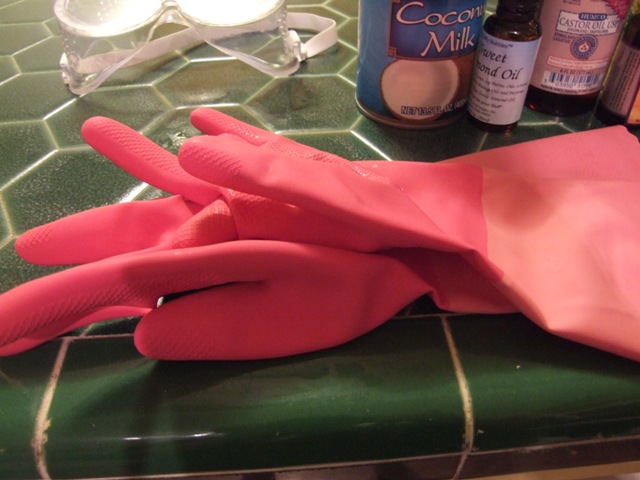
Don’t forget the goggles and gloves when handling lye!

 The new pink scale from Target . It is wonderful!


To make a two pound batch (two pounds of finished soap), I used:
· 5.2 oz. Palm
· 6.3 oz. Olive (did not have this tonight, so used canola instead)
· 6.3 oz. Coconut
· 1 oz. Castor
· 2.1 oz. Canola
along with:
· 3 oz. lye
· 7.2 oz. Coconut Milk
· .5 oz. Essential Oil of Orange
To make your own homemade soap here is what you will do:
- I suggest that you wait until the kiddos are in bed and no one is around. Lye is very dangerous to touch! It will burn burn burn and scar. We are talking hospital trips here so no kiddos should be around and be sure to place the soap high out of reach while it’s curing.
Instructions:
- Prepare your mold. If you are using a wood mold it will need to be lined with wax paper. I used a plastic mold and you can also find silicone molds that you don’t need to prepare (since I made my first I do suggest the wood molds now for bigger block size that you cut). Alternatively, use a box lined with plastic bags… just make sure there are no holes for the soap to get through.
- Wear your protective glasses and gloves for this next part. Place the glass jar or glass bowl on the scale and tare your scale. Pour distilled water into the jar until it reads 7.2 oz. Set aside.
- Put the second glass jar or glass bowl on the scale and tare the scale. Wearing your protective gear, carefully pour lye into the jar until your scale reads 3 oz.
- At this point I will suggest taking it all outside. The mixture will get very hot! Still wearing your protective gear, slowly pour the lye into the water. Stir the mixture. It will become quite hot so keep this in mind if you need to move it. Let the mixture cool to about 100 degrees and do not move it at this point.
- While the lye is cooling, measure all other ingredients EXCEPT the essential oils and warm them together in your pot or slow-cooker. Use a thermometer to measure the temperature. You’ll want the lye water and the oils to both be around 100 degrees and it’s best if they are around 10 degrees or less of each other.
- Once the temps match up then slowly pour the lye/water into the oils.You’ll notice that the solution starts to thicken. This is the fat in the milk actually making “soap” with the lye in the lye solution. Use the immersion blender to bring the batter to a consistency that resembles cake batter.
- Add the essential oils at this point.
- Pulse the immersion blender a few times to mix in the essential oils. This should bring the mixture to a thicker consistency like brownie batter or a medium trace. In other words, the drips that come off the blender should just sit on top of the mixture instead of blending right back into the mixture.
- The next step is to pour the soap batter into your prepared mold. At this point the soap is not fully “cooked” yet and could irritate your skin so you should still be wearing your gloves and even eye wear just in case there is a splatter.
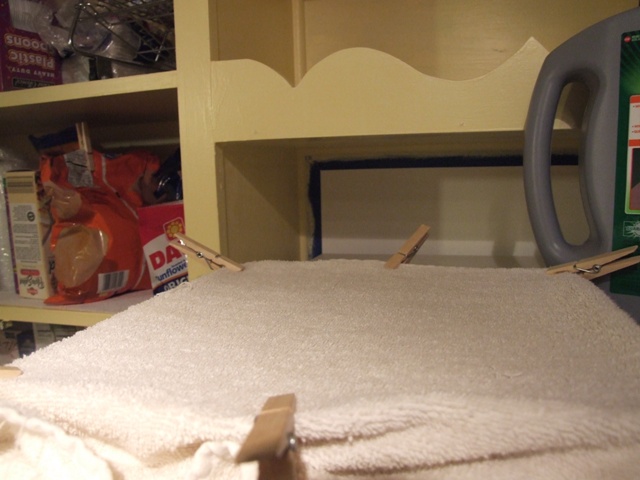
- You can now leave it to rest in a corner or safe place and cover with a towel and/or a box.
- Let the soap sit like this for 24 hours. Then you can un-mold your soap and cut it into bars. It makes around 8-10 bars or so weighing around 4 oz. each.
- Put bars up in a dry area (standing if possible) with some space in between them to allow for ventilation. You’ll need to let them sit for 4-6 weeks (this is the patience part). Otherwise the soap will be too harsh because it hasn’t completed the saponification process yet.
Here is a pic of the “incubation” process as I like to call it… no peeking!

Dreamsicle Soap
Thursday 31st of December 2015
[…] mmm…. it’s a creamy orange dream (with sugar on top)! Made with pure essential oil of orange and coconut milk – not bad for my 2nd try at it.See my previous post on Soap Making 101! […]
Creating Color Harmony | Artissima - Blog of ArtiFactory Studio
Monday 29th of April 2013
[...] in the processes of candle-manufacture.” Rachel started her blog as a way to document her soap-making! Such… synchronicity! But onward…to The Art of Color Harmony, [...]