• Menu
  • Skip to right header navigation
  • Skip to main content
  • Skip to primary sidebar

Before Header

Facebook Pinterest Instagram Youtube Twitter

Sprinkle Some Fun

Easy recipes, Holiday Recipes, Holiday Crafts, Party Ideas and DIY project inspiration.

  • Recipes
  • DIY & Crafts
  • Parties
  • Cake
  • Holidays
    • Christmas
    • New Years Eve
    • Valentine’s Day
    • Easter
    • 4th of July
    • Fall
      • Halloween
  • About Me
    • Work With Me
    • Privacy Policy
    • Disclosure
    • Cookie Policy
    • Nevada Privacy Notice
    • California Privacy Notice
  • Shop

Disney FROZEN Cake Tutorial

Jump to RecipePrint Recipe

Sharing is caring!

  • Share
  • Tweet
  • Pin
1474shares

This Disney Frozen Cake is an ice princess’ dream come true!

Complete with an Ice Candy Mountain and all the characters from the original Frozen.

Disney Frozen Cake Tutorial

Have you seen Disney’s “FROZEN” yet?  We went to see it soon after it came out and my girls have talked about it non stop!  That is why we celebrated the movie with a Frozen party!

This easy Frozen cake was the centerpiece of it all and I think it turned out fabulous!

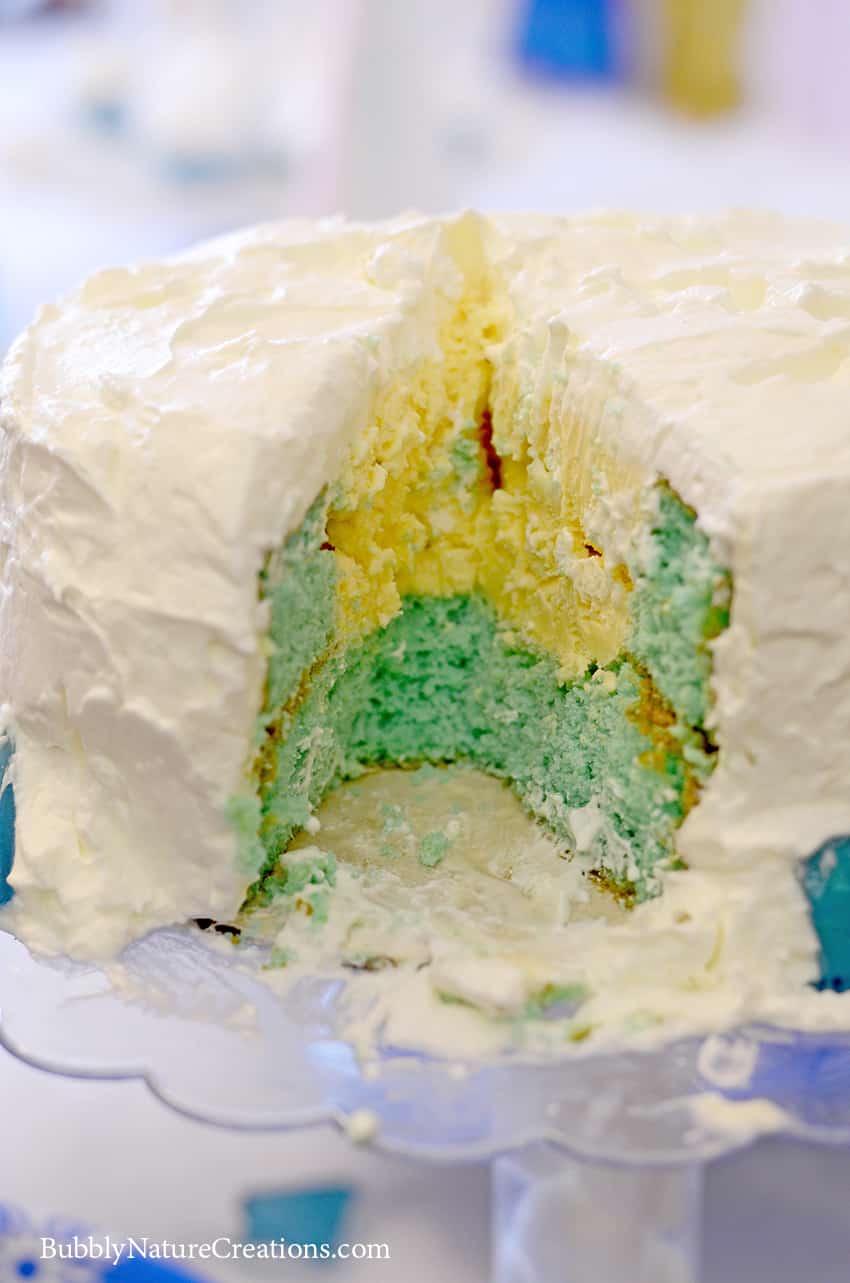
This Disney Frozen Cake is amazing from the Ice Candy Mountain, the whipped cream topping, the little figurines and it also has a secret inside… ICE CREAM!  Disney Frozen Cake the ORIGINAL Blue Ice Candy!

I used simple decorations for the cake including these homemade “Ice” candies!  It’s just a simple sugar candy that I colored blue… instructions are found below!

Disney FROZEN Busy Book for a Easy Disney Frozen Cake with Ice Cream!

 The figurines I used were found in a FROZEN Busy Book I bought at Walmart.  It has Elsa, Anna, Olaf, Kristoff, the trolls, and even the ice monster!  They turned out perfect for the cake and were just the right size.  I suggest hot gluing a plastic disk (like a poker chip) to the bottom of the figures that tend to sink into the whipped cream icing!

Easy Disney Frozen Cake with Ice Cream!

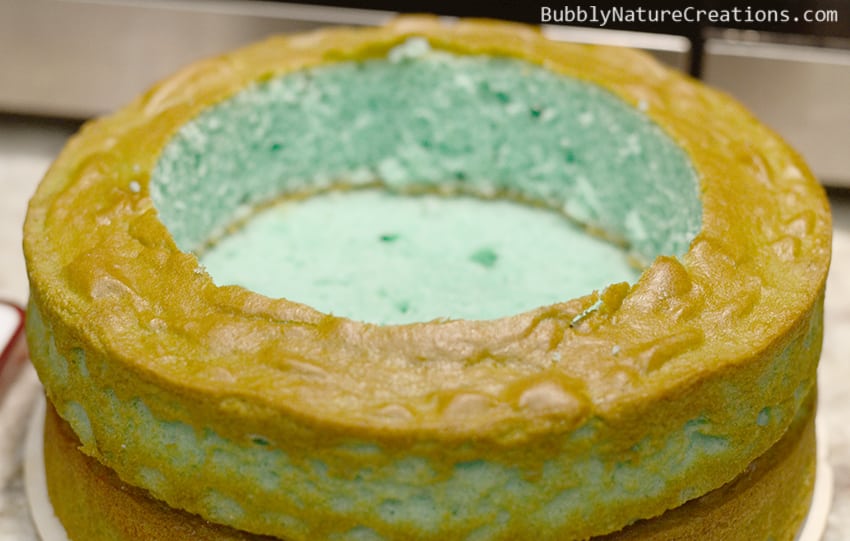
For the Disney Frozen Cake I just used  a white boxed mix and put a little food coloring into it.  I made two 8 inch rounds and cut the center out of the top layer.

Easy Disney Frozen Cake with Ice Cream!

Then I filled it in with vanilla ice cream and covered it up with plastic wrap before storing in the freezer the night before the party.  The day of the party I waited until around 10 minutes before the food was served and put the stabilized whipped cream icing on top and all the decorations.  The cake stayed frozen for the whole party which wasn’t something I expected, but I was glad it did!  I would say that on average the cake will stay frozen for a good 30 minutes in indoor temperatures before it really starts to melt.

Easy Disney Frozen Cake with Ice Cream!

Ice Cream Cakes are SOOO good!  Nothing better than a little Cake and Ice Cream at a party and I love that it’s so easy to serve them together!  This Disney Frozen Cake will definitely be a big hit!

Be sure to check out the Disney FROZEN Party post for more great ideas! 

Print Recipe

Disney FROZEN Cake

A Disney Frozen Cake that is super cute and creative.  The ice candy mountain at the top is fun to make with blue candy shards.  
Author: Rachel

Ingredients

  • boxed cake mix with ingredients from box to make it.
  • blue food coloring
  • about 3 to 4 cups vanilla ice cream
  • Whipped Cream Frosting recipe below

Instructions

  • Make a two layer cake using a boxed white cake mix and a little blue food coloring. Make the cake according to the box. Set aside until cooled completely. You will want to place the bottom layer on a cardboard cake disk and level the bottom layer out with a knife. Take the next layer and cut out the center leaving around 2 inches around the perimeter. Fill the center with slightly softened ice cream and wrap the whole cake with plastic wtrap. Place in freezer until ready to serve. When ready to serve use stabilized whipped cream or a buttercream to ice the cake with. It's best to ice the cake within 10 minutes before you serve or ice and freeze the cake.

Notes

1 1/2 cups heavy whipping cream
1 tsp. vanilla
1/2 cup powdered sugar
1 1/2 tsp. Unflavored Gelatin
4 tsp. water
For the whipped Cream Frosting: mix the water and gelatin in a large microwave safe bowl. You will want this bowl to be large because the gelatin will foam up in the microwave. Microwave on high for about 20 seconds or until all the gelatin is dissolved. Let the gelatin cool off to a lukewarm temp before adding it to the cream, but don't let it get cold because it will become a gel. Meanwhile with an electric mixer whip the heavy cream, sugar and vanilla on high or until thickened. Add the gelatin to the whipped cream slowly and beat on high until the whipped cream forms stiff peaks.
When ready to serve take the cupcakes from the freezer and top with the whipped cream. You can use this whipped cream frosting like you would any other frosting. It will hold its shape for at least 2 hours and should hold longer if refrigerated.
Print Recipe

Blue Ice Candy Decorations

This recipe may not work when it's humid outside... the humidity level can alter the way the candy sets up and when it is humid it will be sticky. It may still work, but you have to be careful when handling it when it is sticky. You can also get similar results using a hard blue candy like jolly ranchers and break them up with a hammer until they are tiny peices. Then cook it on a cookie sheet for around 7 minutes at 350 if you don't want to make the ice candy from scratch.
Author: Rachel recipe from AllRecipes

Ingredients

  • 3 3/4 cups white sugar must be white granulated sugar
  • 1 1/2 cups light corn syrup
  • 1 cup water
  • 1 tablespoon lemon or other flavored
  • extract- make sure that you use a non colored extract or it will tint the finished product
  • blue food coloring I used about 10 drops of McCormick food coloring

Instructions

  • In a medium saucepan, stir together the white sugar, corn syrup, and water. Cook, stirring, over medium heat until sugar dissolves, then bring to a boil. Without stirring, heat to 300 to 310 degrees F (149 to 154 degrees C), or until a small amount of syrup dropped into cold water forms hard, brittle threads.
  • Remove from heat and stir in flavored extract and food coloring, if desired. Pour onto a greased or silpat lined baking sheet/ jellyroll pan (the kind with raised edges). Let cool, and break into large pieces that resemble broken ice. Store in an airtight container.


About Rachel

Rachel
Rachel is the creator of Sprinkle Some Fun, a site dedicated to fun recipes, crafts and other ideas that bring families together. She enjoys undisclosed amounts of coffee, reading scriptures, long talks with her husband and watching her six kids grow up.

Previous Post: « Disney FROZEN Jello “Ice” Cubes
Next Post: Disney FROZEN Snow Cap Punch »

Reader Interactions

Comments

  1. Rebecca

    Jan 5, 2014 at 1:17 pm

    If I were to make the candy “ice” ahead of time how long do you think they’d store and would they possibly store better or longer in the fridge/freezer?

    Reply
    • Rachel

      Jan 5, 2014 at 2:58 pm

      The candy ice is just like a sucker. I placed mine in a plastic ziplock bag and it lasted a few weeks just fine. As long as moisture does not get to it it will be fine. I wouldn’t store it in the freezer or fridge because of moisture though.

      Reply
      • Rebecca

        Jan 5, 2014 at 5:38 pm

        Thank you so much! The sooner I can mark one more thing off my list the better 😉

      • Jen

        Jan 29, 2014 at 12:44 am

        how do you make a Disney frozen doll cake a pretty one for my little girl for her 9th b-day??????

      • Maria

        Mar 11, 2014 at 6:53 pm

        How do you make the “ice” candies?

      • Maria

        Mar 11, 2014 at 6:55 pm

        nevermind

  2. Sheree Smith

    Jan 8, 2014 at 11:59 am

    I know this is a crazy question but what kind of extract do I use?

    Reply
  3. Rachel

    Jan 8, 2014 at 12:14 pm

    It’s up to you. I think vanilla would work great with this recipe. I used lemon which was okay, but I think I’d use vanilla next time.

    Reply
    • Sheree Smith

      Jan 9, 2014 at 2:41 pm

      Thank you so much !!! I will be making this cake for my daughters 4th birthday party 2 weekends from now… I’m so glad I found ur recipe!!! You defiantly have an AWESOME TALENT!!!!

      Reply
      • Rebecca

        Jan 9, 2014 at 4:20 pm

        Sheree, I used peppermint in mine (because winter and peppermint always go together in my book) and it’s delicious but since it’s such a strong extract I only used 1 teaspoon. I think if I do it again I might do it with 1 1/2 teaspoons and that would be perfect. Also, since we have some kids coming that aren’t huge fans of ice cream I’m going to do 1 layer blue, the other white, stack them, cut them into different sized circles and alternate the shapes so when you cut the cake it will be white, blue, white, blue, etc. in each layer. Does that even make sense? Ironically, I’m doing this for my daughters 4th as well but it’s happening this Sat 😉
        Rachel, the candy turned out perfect. Thanks again!

    • stiney

      Jan 19, 2014 at 8:12 pm

      I would recommend using an extract with a clear color. I used vanilla and it turned the candy brown. Couldn’t dye it blue after that.

      Reply
  4. Amy watts

    Jan 8, 2014 at 5:38 pm

    I’ve attempted to make the candy ice twice and it does not set up…any ideas about what i could be doing wrong?

    Reply
    • Rachel

      Jan 8, 2014 at 7:56 pm

      Hi Amy. Make sure it gets 300 to 310 degree F. It also might be the dye or extract you are using so I would suggest using a little less dye and omitting the extract since it’s not setting up. Hope that helps. This is a recipe originally from AllRecipes and it worked the first time for me, but there are similar recipes for hard candy if you search for it.

      Reply
      • Amanda

        Jan 4, 2015 at 7:14 am

        I made the sugar candy and tried to stand it up in the cake but it started to droop over and ended up laying on the cake. Any suggestion on what I can do next time to fix this issue. I used wilton vanilla flavor and wilton blue gel dye. Thanks

  5. carrie96

    Jan 9, 2014 at 4:00 pm

    Thanks so much. My girls will love a cake like this. I hope I can find the busy book at my walmart!

    Reply
    • Rebecca

      Jan 9, 2014 at 4:24 pm

      If you have time I would suggest you just order it from Barnes and Noble.com and with a quickness. Every single store I went to was almost entirely sold out of all things Frozen (including Target, Walmart, The Disney Store, and JcPenny) and that was with me asking the stores to check the three stores closest to their location as well :/

      Reply
  6. Deanna

    Jan 12, 2014 at 2:36 pm

    What food coloring did you use to get that color.

    Reply
    • Rachel Rockwell

      Jan 21, 2014 at 12:32 pm

      I used a mixture of about 4 or 5 drops of NEON blue from McCormick and a drop of teal from Wilton gel colors.

      Reply
  7. Deanna

    Jan 12, 2014 at 2:37 pm

    What food coloring did you use to get that color

    Reply
  8. CiaoAnnie

    Jan 16, 2014 at 8:16 pm

    I absolutely love this cake… especially that it is an ice cream cake! I hope to re-create something similar for my niece’s birthday! Thanks for the inspiration 🙂

    Reply
  9. Shannon H

    Jan 16, 2014 at 10:45 pm

    Using your glass candy idea on my son’s 5th birthday cake as red, yellow and orange flames! A fireman/firetruck theme. Just made the candy tonight and all three colors turned out great! Thanks for the idea!

    Reply
  10. Rebecca

    Jan 17, 2014 at 11:41 am

    Hey Rachel. I just wanted to let you know how things went for us. I stored the candy in Ziploc bags (big pieces in one and little pieces in another). By the time the party came three days later all of the pieces had melded together in each bag into one giant chunk of candy. Next I made the cake but didn’t do ice cream cake (we have some kids in the family that prefer cake without ice cream and ice cream without cake so this covered all my bases). The cake was decorated around 2:30 and sat on our table as part of the decor until we cut it about 6:00. Over the course of those 3.5 hours the candy had drooped forwards or backwards, depending on gravity.
    So here’s my question. Did you store each candy piece in between parchment/wax paper or did I just not cook mine quite long enough? It set up rock hard but when the candy came in contact with any type of heat it instantly stuck. I did the water test to make sure it was cooked long enough and it seemed to be just right. I’m not sure what I did wrong. Any suggestions would be greatly appreciated as I can see the hard candy as being something to certainly use again in the future

    Reply
    • Rachel

      Jan 17, 2014 at 11:53 am

      Hi Rebecca. Sorry it didn’t work out as well for you. I did let my candy sit out overnight the night I made it and then I stored it in a ziplock bag. I didn’t use all the candy so I had a lot left over and it lasted weeks in the bag. I ended up throwing most of it out cause we aren’t big candy eaters. Not sure what went wrong cause this is the exact recipe I used. In a pervious post I made campfire cupcakes and I crushed up butterscotch and cinnamon hard candies then baked them… It gave the same effect as this recipe. You might find that easier than having to make sure the candy gets to the right temp etc.

      Reply
  11. Jenn Strack

    Jan 18, 2014 at 9:06 am

    I LOVE this cake, wow, it is darling! Curious how many little people you would estimate it would feed????

    Reply
    • Rachel Rockwell

      Jan 21, 2014 at 12:37 pm

      A double layered 8 inch round cake will feed around 12 to 15 kids with small slices.

      Reply
  12. Nicole B

    Jan 18, 2014 at 10:58 am

    I am making it now. Unfortunately, I used my organic sugar, which has a brownish color. The blue food coloring made the candy green. So, lesson learned that when the recipe says white sugar, that does not just mean granulated. My question is, how in the world do you clean the pot? Thanks!

    Reply
    • Nicole B

      Jan 18, 2014 at 12:47 pm

      The pot actually cleaned up easily in super-hot water. Trying my next batch now with white sugar.

      Reply
      • Rachel Rockwell

        Jan 21, 2014 at 12:38 pm

        Hope it works with the white sugar… yes… the pot in hot water will dissolve all the candy off.

    • Stacey

      Apr 10, 2014 at 8:22 pm

      I just made my candy tonight, and white sugar and it is still more green than I expected it to be simply from boiling it started to turn slightly yellow. But it’s like a teal color, so I’m calling it good and not bothering with a new batch. I also didn’t have neon dye, but just blue. That might have made the difference too.

      Reply
      • Carmen

        Aug 29, 2014 at 6:03 pm

        Mine always goes Green too 🙁

  13. Diane B

    Jan 18, 2014 at 12:07 pm

    I’m in the process of making this for my 16yearold! We used chocolate cake mix because that’s what she wants. Gonna make buttercream frosting. I made the “ice” last night. In my stupidity instead of greasing a cookie sheet I lined with wax paper. This morning, it’s completely stuck. I broke off a piece to see if I could wash off the wax paper, like a label off glass. Yes, I can. And yes, this is sharp as glass! I sliced my index finger and it finally stopped bleeding after 2.5 hours!!!

    Reply
    • Rachel Rockwell

      Jan 21, 2014 at 12:40 pm

      Owie… :/ Glad the wax paper came off though!

      Reply
  14. Jenn S

    Jan 18, 2014 at 2:39 pm

    Another question. Do any of you think I could make the cake, fill with icecream, ice and then freeze until day of party….in about 4 days?????? Would LOVE to get as much done as possible ahead of time!

    Reply
    • Rachel Rockwell

      Jan 21, 2014 at 12:41 pm

      Yes you can do it ahead of time. Cake freezes very well as long as you wrap it tight with plastic wrap.

      Reply
      • Dana

        Jun 20, 2015 at 2:40 am

        I’ve been reading contradicting reviews on freezing an iced cake using the whipped cream. Did you try it? would it weep? How long before serving it can I put it out?

        on a second note, I’ve made the candy today, first time it turned green, and its because I accidently reached 330 instead. so the second time around, I turned it off at 298, turned out a gorgeous blue color!

  15. Amanda G.

    Jan 20, 2014 at 1:07 am

    I don’t usually comment on things like this, but I was so pleased with how it turned out, I wanted to share :). I made this for my daughters 7th birthday. I wish I has read the comments before I made it. It may have saved me some of the same issues. I made the “ice” 3 times before I got it right. First time was undercooked. Second time overcooked. Third time was the charm. I may have made it thicker than yours, but it still looked great!
    Normally with movies like this they have merchandise everywhere! I looked all over the county without any luck. I thought I would find something, but there was seriously nothing, and I didn’t give myself enough time to order it online. So I had to get creative. Instead of making the whole cake blue, I dropped blue food coloring in the batter and marbled it using a butter knife to cut through the blue dots, to make a swirly looking pattern.
    It was too plain without anything on top, so I took modeling dough (usually I make it, but this time I bought some Wilton brand for convenience) and I modeled an Olaf. Then wrote on the top of the cake “do you wanna build a snowman?” It was the only thing I could think of. She loved it! Thank you!

    Reply
    • Rachel Rockwell

      Jan 21, 2014 at 12:42 pm

      Glad it all worked out. Candy is tricky to make… I am in the process of adding some suggestions to the recipe. I am sure that with your Olaf the cake looked super cute!

      Reply
  16. Leslie

    Jan 22, 2014 at 6:25 pm

    How long does it take for the Rock candy to harden completely?

    Reply
  17. Mindy

    Jan 24, 2014 at 12:00 pm

    I just read that over cooking it can cause a yellowing which causes it to turn out green! Take it off the burner at 290. It will still be heating. Here’s to my second batch 😉

    Reply
    • Mindy

      Jan 24, 2014 at 12:08 pm

      It worked!!! Yay! No alge infested ice. Lol

      Reply
      • Stacey

        Apr 10, 2014 at 8:23 pm

        That’s the problem I had! It’s more teal then green, so I’m calling it good though.

  18. Lisha

    Jan 25, 2014 at 2:33 pm

    I was wondering what you used for the cake base and where you found it. Thanks!

    Reply
  19. Allison

    Jan 26, 2014 at 3:00 pm

    Hello! I am making this for my daughter’s 5th birthday party on Tuesday. I did the candy ice today and I couldn’t get the temp up to 300 no matter what! Do you think I should just make another batch trying something different or just wait and see if the one I made works out?

    Reply
  20. Lorna

    Jan 27, 2014 at 7:59 am

    can you use candy flavoring oils!

    Reply
  21. Allison

    Jan 28, 2014 at 10:05 am

    ok I just finished mine and omg it came out so good!! thanks for such an awesome idea! I wish I could post a pic!

    Reply
  22. ashley

    Jan 30, 2014 at 9:21 am

    I put mine on wax paper is it gonna work???

    Reply
    • Gen

      Feb 18, 2014 at 8:45 am

      I used parchment paper and it worked perfectly. Didn’t stick at all. Came right out.

      Reply
  23. Tia

    Feb 1, 2014 at 8:42 am

    I made the candy for my daughter’s party and I cant get it out of the pan! I greased it, and the candy seems to have set just fine. How did everyone get it out???

    Reply
    • Melanie

      Feb 5, 2014 at 9:34 pm

      I just flipped my pan over onto a clean counter , came right out. . then made a funmess breaking it!

      Reply
  24. Melanie

    Feb 5, 2014 at 9:29 pm

    I am making this cake for Sat. Love it! I have made the candy so far. It seems very heavy. Any advice for getting it to stand up and stay up on the cake?

    Also on your backdrop: what did you use for the base to hold up the lights ? It looks like some kind of board behind the lights?

    Thank you for all of your ideas and help! 🙂

    Reply
  25. Ashley O'Brien

    Feb 7, 2014 at 7:24 pm

    I’m having issues getting the “ice” to solidify… not sure what I did wrong. 🙁 Trying to figure it out for my daughters party tomorrow!

    Reply
    • Rachel Rockwell

      Feb 7, 2014 at 11:07 pm

      Hi Ashley… unfortunately I can’t say for sure, but it may be due to humidity issues.

      Reply
  26. Ciao Annie

    Feb 10, 2014 at 6:20 am

    Seriously can’t get over how cute this cake is! I made an all-ice-cream version for my niece’s 5th birthday this weekend and it was a huge hit! Thanks for the inspiration!

    Reply
  27. Julie

    Feb 15, 2014 at 7:30 am

    Hi! Just made the ice for a Frozen cake I did this weekend. I made 2 batches…both turned out great! One was a little soft (but still worked fine) and I only let it boil to 300 degrees…the other I let get to 310 and it was perfectly solid and crystal clear! LOVED this idea..thank you so much.

    Reply
    • Lisa

      Dec 16, 2020 at 9:13 pm

      Can I ice the cake with the icing and the freeze it do you think? JIt’s so I don’t have much to do on the day?

      Reply
  28. erica

    Feb 17, 2014 at 3:27 pm

    Any suggestions for a natural food coloring. I don’t like using products with the chemical dyes

    Reply
  29. Gen

    Feb 18, 2014 at 8:41 am

    I’m making a Disney Frozen party for my daughter in 3 weeks. I wanted to make the hard candy now in case I mess it up and had to re-do it.
    It worked right away and it looks AMAZING!! The blue is the exact Frozen blue. It set pretty quickly and it taste so yummy! I used a little bit of pure almond extract only because that’s what I had at home, wasn’t going to spend $4 on extract that I would probably never use again!

    Thank you for the candy recipe and the idea, it looks incredible and I can’t wait to make the cake and assemble it all

    Reply
  30. Michelle

    Feb 19, 2014 at 4:14 pm

    Would this recipe work without the corn syrup as I have no idea where to find it ?!! Thanks

    Reply
  31. Libbi

    Feb 20, 2014 at 9:55 am

    Hi Rachel,

    Making this cake for bday party on the 1st. Can I make the cake and freeze the night before (if I wrap in saran wrap?) then ice as well as add the candy in the morning the day of party, then stick back in the freezer until ready to serve? Or even better, ice and add candy evening before? Would you think the icing and candy hold up on the cake in the freezer for 1 evening? Thanks for your help!

    Reply
  32. Elle

    Feb 22, 2014 at 2:40 am

    My candy was an epic fail. I followed the directions exactly. Heated it to the correct temperature. Humidity is not an issue where I live, so I don’t know what went wrong. The candy looks beautiful in color but it has bubbles in it. It also did not harden well. It is bendable instead of hard “sucker” type candy. So I used butter-cream frosting hoping it would hold the candy better against the cake. I also bought rock candy on sticks and in bulk because the shards would not stand up on top of the cake – they just drooped. It still came out nice, but I had to improvise. I definitely need to work on my candy making skills.
    I really do like your ideas and presentation. Thank you.

    Reply
  33. Christie

    Feb 23, 2014 at 6:34 pm

    Thank you! It was one of her favorite cakes ever!

    https://scontent-a-ord.xx.fbcdn.net/hphotos-prn1/t1/1977145_592835997473398_882251132_n.jpg

    Reply
  34. Jessica

    Feb 28, 2014 at 1:36 pm

    Hi! I am about to make the candy. What size cookie sheet should I use? I would appreciate your help!

    Reply
  35. Judy

    Mar 1, 2014 at 8:29 am

    How long do you take the cake out of the freezer to serve? Want cake to be defrosted but not the ice cream! BTW, if your candy keeps burning, I saw a recommendation on another site to be sure to use cane sugar and not beet sugar. Most sugar not labeled as cane sugar is probably beet sugar. My candy turned out after I bought cane sugar.

    Reply
  36. Kim

    Mar 5, 2014 at 12:36 pm

    How long does it take for the candy to set? I don’t have a thermometer that reached 310 degrees…hope it works!

    Reply
  37. Donna

    Mar 15, 2014 at 10:22 pm

    My blue ice candy was a failure. I used a cookie sheet with no lips and icing dripped all under pan. Saved some and put in freezer but became soft when removed from refrigerator. Disaster. Made hard candy before with success. Will try once more. Any suggestions? When do you add extract?

    Reply
  38. Cathy

    Mar 20, 2014 at 5:38 pm

    Made the candy ice and only used half of the recipe. Produced a nice thin candy that was perfect. Making the cake tomorrow for my granddaughters party Sat. We have Ana and Elsa coming to our party. So excited. Thank you for your inspiration and sharing.

    Reply
  39. Renee

    Mar 26, 2014 at 3:55 pm

    So excited to try this cake! What size cookie sheet did you use? Thanks!!

    Reply
  40. Jennifer

    Mar 27, 2014 at 9:21 pm

    HI, I am making this cake and currently have the cake part in the freezer and was planning to assemble the day of the party (saturday). It seems like you actually served the cake part frozen – is that correct? I was thinking of thawing the cake and then adding the ice cream and then icing. Do you think I could serve the cake thawed but the ice cream in the middle? Or would the ice cream just melt all over the cake? Isn’t the cake too hard to eat frozen?

    Thanks so much,
    Jen

    Reply
    • Rachel

      Mar 27, 2014 at 10:05 pm

      Hi! You can serve it either way frozen or thawed. The ice cream might melt faster if the cake is not frozen so I would at least refrigerate it. I really like the taste and texture of frozen cake as long as the cake is not too dense. Cake mixes do well frozen. We did have a little trouble cutting into the cake, but no one complained of the aste or texture if the cake. I find that once it’s on the plate it thaws quickly. Hope that helps!

      Reply
  41. Tracey

    Mar 27, 2014 at 11:13 pm

    Thank you for sharing this recipe. Im making a FROZEN themed bday cake for my daughters party on sunday. It took me a few tries, but it came out amazing. I even made little clear ice cubes that i will cut into blocks to put next to christoff n swen! Thanks again!

    Reply
  42. Angie

    Mar 30, 2014 at 7:45 pm

    Thanks so much for this idea! I made the blue ice and it turned out perfect! It took forever for the temp to reach 300, so at 250degrees, I thought to put a lid over half of the pot and it worked a lot faster! Also, I used just lemon juice because I didn’t have any extract and it was a very pretty blue! My husband was amazed and my daughter LOVED her cake! Thanks for posting! 🙂

    Reply
  43. Lori

    Mar 31, 2014 at 2:55 pm

    OK, don’t usually bother to post but since I made 8 batches of the candy “ice” trying to get it to come out right, I thought I would share my experience!
    First, my candy thermometer was faulty…never got it to register past 250 – so I now believe I am an expert at doing this without a thermometer.
    -It could take around ten minutes AFTER the syrup starts boiling to reach the proper temp – so be patient!
    -Once it gets close to the right temperature, the consistency and the bubbling will really change
    -When you think you are close to temp, keep stirring gently. This is a little hard to describe, but you might begin to feel while you are stirring that the syrup could become “lumpy”
    -wait until the mix starts to turn color. If you take it off too soon, the candy won’t become completely hard and will bend if subjected to gravity.
    -the color you are looking for is a light golden or light caramel. It won’t be dark, but it will be definitely colored. It will have a pleasant smell, definitely not burned.
    -take it off the heat, stop stirring and let some of the bubbles dissipate. Stir in your flavor (I used mint), and ONE drop of blue color. Add color one small drop at a time to ensure that it does not turn “green”.
    Following these directions I ended up with a beautiful turquoise color.

    Thank you for the idea!

    Reply
    • Rachel Rockwell

      Apr 2, 2014 at 9:43 am

      THanks for the tips… hope this helps someone that is having trouble.

      Reply
    • Shannon

      Sep 17, 2014 at 9:50 pm

      Thank you so much. From using your tips, I was able to make two perfect batches, without a candy thermometer, in humid florida!

      Reply
  44. tara

    Apr 2, 2014 at 9:17 am

    I melted blue jolly ranchers on aluminum foil at 350 F in the oven for about 5 minutes, let it cool until i could handle it then formed it. It was SO much easier than the candy. I failed with the candy on multiple tries. JOLLY RANCHERS!!!!! 🙂 Beautiful cake by the way, thank you!

    Reply
    • Rachel Rockwell

      Apr 2, 2014 at 9:42 am

      great idea!

      Reply
    • Ashley

      Jul 8, 2014 at 6:51 am

      My blue jolly ranchers turned green!!! They were easy and came out perfect… But perfectly GREEN!

      Reply
    • Lisa malinowski

      Dec 11, 2020 at 12:02 am

      Hi there, I just made my jolly ranchers ice like you suggested doing, looks great! But, how did you store it??? Party is ina week and a half

      Reply
  45. Erin

    Apr 2, 2014 at 1:30 pm

    The ice candy turned out perfectly! It took about 20 minutes or so to reach 300 degrees so be patient! I also sliced my hand breaking the candy – wow! It is sharp 🙂

    Reply
  46. Wendy

    Apr 3, 2014 at 3:02 pm

    do you think the “ice” candy would work poured into a sand castle mold to make “ice” castles for the party?

    Reply
    • Rachel Rockwell

      Apr 3, 2014 at 3:09 pm

      I’m not sure, but it sounds neat!

      Reply
  47. Jessica

    Apr 4, 2014 at 3:33 pm

    I am so crazy! I thought putting the ice candy in the fridge was a good idea! HELP, is there any salvaging it? or should I try a new batch? The party is tomorrow lol

    Reply
    • Jessica

      Apr 4, 2014 at 3:35 pm

      I also think I didn’t let it boil long enough! Its been in the fridge for 5 hours and is still sticky goo 🙁

      Reply
  48. Kim

    Apr 11, 2014 at 8:47 pm

    How did you get the big chunks of “ice” to stand up on the cake. Thank you for the idea, my daughter is going to love it!

    Reply
    • Rachel Rockwell

      Apr 11, 2014 at 9:05 pm

      Hi Kim! I just stuck them a half an inch or so into the cake. They stayed like that until I needed to take them off for serving.

      Reply
  49. Renee

    Apr 12, 2014 at 8:46 am

    I just made this cake and my daughter couldn’t be happier – thank you again for posting the directions!! Wanted to leave some tips for anyone else trying the candy for the first time. I used a pan that was about 14 1/2 x 10 and my “ice” came out very thick, but usable. Once it cooled, I hit it with the heavy end of a screwdriver (through wax paper) to break it up. I can’t imagine making the candy without a candy thermometer.. it really is key.. it takes a long time, and a good pot (I used cast iron), to get the candy hot enough. I think it took about 30 minutes and very high heat.

    Reply
  50. Tara

    Apr 23, 2014 at 9:09 am

    Love the “ice shards” candy on your cake — been attempting to make them for my daughter’s cake…my candy keeps turning green even with only a drop of blue coloring. Any ideas?

    Reply
  51. Tara

    Apr 23, 2014 at 12:28 pm

    after 4 attempts, I finally got the “ice” to come out the right color — first 2, they were green, third time burned. Apparently my thermometer is not accurate…

    Reply
  52. Jody

    Apr 26, 2014 at 10:38 am

    Made this for my daughter’s 10th birthday party today. Two batches of ‘ice’ to get it right. Neon teal color turned my ice green rather than teal, but it looks just fine. Did not use ice cream, just a two layer 9″ cake. The dolls I found are a touch bigger than yours, but once ‘glued’ to a disc have stood well. Still need to put the big ice shards on the cake.

    Reply
  53. Lyndsay // Coco Cake Land

    May 12, 2014 at 4:34 pm

    oh wow i LOVE the ice candy! beautiful job on the cake, and i love that it was truly “frozen” !! ^__^ can’t wait to try the ice candy method, thank you for sharing!

    Reply
  54. frozen dolls

    May 12, 2014 at 8:09 pm

    With the Rapunzel Color & Style doll, girls can clip fancy stencils onto her
    golden hair and then paint her hair with water to change
    its color and decorate it with different colorful patterns.
    Bravely battling the frigid elements, they race to save
    the kingdom before it is frozen forever. We have older (much, very old) brothers and have spent most of our lives around cars.

    Reply
  55. Maria

    May 14, 2014 at 10:05 am

    Hi,
    Thank you so much for your post making the “ice”. I just made it last night and it took forever to reach the right temperature, but it did. Mine came out a little more on the greenish side, but that’s ok, I’m still happy with it. This morning I checked it out and is hard as a rock, but sticky. Is that the way is supposed to be??????? thanks!!!!!!!!!!!!!!!!!!!

    Reply
  56. Felicia

    May 14, 2014 at 11:29 pm

    This blog was the answer to my prayer as far as my daughters cake is concerned (3rd birthday), however, I CANNOT find the busy book with the figurines anywhere. i can’t find it at walmart, it is sold out on amazon…. I just really don’t know what to do about the cake. any ideas – please send my way.
    thanks!

    Reply
    • Rachel Rockwell

      May 15, 2014 at 10:41 am

      Hi Felicia! I think that there are others with the same problem, but they have used the smaller 3 inch dolls instead. Those are bigger so you may only be able to include one or two.

      Reply
  57. Barb

    May 26, 2014 at 9:36 pm

    Can you tell me where you got your cake stand? Thank you

    Reply
  58. DalNZ

    May 28, 2014 at 7:26 pm

    Just had a go at making the blue candy, it’s teal, but I can live with that. Thank you for the idea and to all who commented, I bought a thermometer yesterday and followed the hints and suggestions listed and I’m sure I would’ve failed completely without. Had to get a cousin in the UK to buy the Frozen cake toppers so this truly is an international enterprise. FIngers crossed the candy sets now.

    Reply
  59. Brigette

    Jun 5, 2014 at 11:58 am

    I noticed a lot of the oil from greasing the pan for the candy was all over it. I tried daubing it up with paper towel quickly which got some off (moving quickly so it didn’t stick). However, you mentioned storing it in an airtight container to keep moisture out, but since it’s already moist from the grease, what do you recommend? Should I just leave it on some parchment and covered with another piece until I need it? I’m afraid it’s going to all stick together like the woman above mentioned. I also happened to use a lemon flavoring that is alcohol-free so they use glycerin as a base. This too is kind of oily, so I’m a little concerned about having some troubles. Thanks for any advice. This is such a beautiful idea!

    Reply
    • Rachel

      Jun 5, 2014 at 12:30 pm

      Yes. Whatever you do if it’s sticky at all do not store them stacked one on another. My last batch I made a few weeks ago was slightly sticky because of our humidity and they did stick together a little. So my suggestion is keep it on top of something non stick like a silicone mat if you have one. Keep it covered loosely and that may help. Leaving it completely out in the air will make it draw up the moisture (Think of a sucker that’s not wrapped up).

      Reply
  60. Tina

    Jun 7, 2014 at 7:07 am

    I made the candy, and it worked! Shocked the hell out of me. The cake feels heavy as a rock, but as long as it looks good – I’m sure the kids won’t bat an eyelid 😉 Thank you sooo much!

    Reply
  61. Sandra

    Jun 7, 2014 at 10:33 am

    Hi
    The candy didn’t work. I mean it did work but it was dark green. I used white sugar though. Any idea? The party is,on day so I can still try again…

    Reply
    • Rachel Rockwell

      Jun 7, 2014 at 11:06 am

      I’m sorry it didn’t work out! I’ve done this twice now and I followed these exact instructions. There is an easier way to make candy ice with already made hard candy if you want to try it. I may put this in my suggestions above since the whole making candy is such a hit and miss. I have a tutorial here: http://bubblynaturecreations.com/2012/10/campfire-mini-cakes-go-camping-series-3.html you can try that with a blue candy like Raspberry Jolly Ranchers or blue suckers.

      Reply
  62. Jamey

    Jun 25, 2014 at 1:03 am

    Rachel and Candy Makers for Cake

    Let me start by saying Thanks for your great site! I live at a high altitude in Colorado. Baking can be difficult! Rachel, after making the candy and it not working I looked up hard candy on-line and found the recipe of allrecipes.com. I see you used that recipe. I would suggest you update to cook for 25 min. as they do. This would have helped, I used a sauce pan that was non stick and it just did not get hot enough! So for those who had candy that was not hard do what I did. I took a spatula and plastic spoon and scraped it up and put it back in a thick skillet (not a non stick one) so the candy was spread out so it was shallow. I was able to recook the candy and make it hot enough in 20 min. I then re-prep the cookie sheet and poured. I knew right away it was good! I was so happy after telling my daughter it did not work:) She will be happy in the morning when I tell her we have candy! I’m doing a summer Frozen cook out party on Sat. and I have so many great ideas I have found on-line and then came up with myself. Mostly is based around Olaf and the puddle which is a water blob with the 41″ Olof ballon next to it for the kids to play on while a water table filled with fake snow with shovel and molds for the kids to play. Snow cones and all sorts of fun themed foods! This is our best party yet and perfect for a 5 year old.

    Reply
    • Shaniya

      Jun 30, 2014 at 6:29 am

      i know where are the other princess cakes i need one for my birthday

      Reply
  63. Jenn

    Jul 3, 2014 at 10:15 am

    Can I make this icing/frosting ahead of time? If so, store in fridge?

    Thank you!

    Reply
  64. Melody

    Jul 9, 2014 at 11:10 pm

    Hi,
    I’m going to make the ice candy for my daughters birthday this week but wondering how long you estimate it cooks on the stove for? How long does it take to get to the right temperature and consistency? Thanks 🙂

    Reply
    • Rachel Rockwell

      Jul 9, 2014 at 11:20 pm

      There really isn’t a way to estimate because it is dependent on your individual stove top. Mine took around 30 minutes to reach the hard crack stage. You need a candy thermometer to make sure it gets to the right temp or it will not turn out.

      Reply
  65. Kimberly Jackson

    Jul 17, 2014 at 10:06 pm

    I too, like so many others, have created green ice. Completely unsatisfied with my “emerald city” cake, I will burn the midnight hours until I get it right. Meanwhile, I found ISOMALT in all of my internet searching. Apparently, you just melt this stuff and it’s the quicker way to make perfectly clear class. I may give this a try next time.

    Reply
    • Rachel Rockwell

      Jul 17, 2014 at 10:23 pm

      Sorry it didn’t turn out. Candy can be finicky, but the isomalt sounds promising. I may suggest it if it works out for you.

      Reply
    • Kimberly Jackson

      Jul 18, 2014 at 12:41 am

      Followup: My 2nd batch came out a beautiful blue! I closely watched the candy to catch it before it started to turn yellow. At 290 it got a hint of a hue so I quickly pulled it from the heat, stirred in about 15 drops of McCormick blue food coloring and then poured it into my molds. I had pre-cut out cardboard to make molds the shape of castle towers and a big circle. Then covered them with tin foil and coated with cooking spray. Since the figurines I found at Walmart have wheels, I figured the circle would make a great ice rink for them to roll around on and the broken glass can line the edges of the rink. Thank you for the inspiration. My 7 year old is going to love this cake!

      Reply
      • Rachel Rockwell

        Jul 18, 2014 at 9:55 am

        So glad to hear!

  66. Mes

    Aug 4, 2014 at 5:46 pm

    I can’t find light corn syrup or anything else suitable for the blue ice. Any other suggestions please as I love this cake? I live in the UK. Thanks!

    Reply
  67. Preethi (Pittsburgh)

    Aug 18, 2014 at 12:30 pm

    I just made this cake for my daughters 4th birthday and she was extremely happy. Thank you for your wonderful website. Reading the comments and those valuable hints from other moms really helped. Soon after that, I decided I should buy a thermometer, as I dint have a lot of time to make many batches of ice candies. I would strongly recommend a thermometer to make life easier. 10$ was a good investment for me. It took around 15-10 mins to reach 300F. After they were done, I let them sit on the counter overnight and lined them between parchment paper next day. The party was 2 days after I made them and, they looked perfect. Having little one at home, didnt leave me time to decorate icecream cake right before the party. So I decided to ice the cake and froze it the morning. Made my life easy before cake time. I am so happy how it turned out. Hope these few details help others planning for their party. Good luck!!!

    Reply
  68. Becky

    Sep 1, 2014 at 7:00 pm

    Thank you for this great recipe! All the Frozen cakes I’m seeing look so difficult and beyond my capabilities. This one is totally doable!

    Reply
  69. http://skobrien.com/UserProfile/tabid/43/userId/11675/Default.aspx

    Sep 6, 2014 at 6:01 pm

    Hello, after reading this awesome paragraph i am too delighted
    to share my experience here with colleagues.

    Reply
  70. Novella

    Sep 14, 2014 at 1:51 am

    Hello! Do you use Twitter? I’d like to follow you if that would be okay.
    I’m absolutely enjoying your blog and look forward to new posts.

    my web page :: laser eye surgery; Novella,

    Reply
  71. youtube.com

    Oct 14, 2014 at 6:45 pm

    It’s an amazing post for all the online viewers; they will take advantage from it I am sure.

    Reply
  72. Vicki

    Oct 24, 2014 at 4:51 pm

    I love this cake idea. I am currently working on it. My only question-can I make the heavy whipped frosting up tonight in a bowl, in the refrigerator= to ice tomorrow? Or will it last that long?
    Also, Found the book at Kmart 🙂

    Reply
  73. power innovator review

    Dec 1, 2014 at 6:25 am

    Helpful information. Fortunate me I found your website by chance, and I am shocked why this twist of fate did not happened earlier! I bookmarked it.|
    power innovator review https://vimeo.com/113240581

    Reply
  74. jj

    Dec 8, 2014 at 4:27 am

    Thank you for the inspiration. I made a Frozen cake with your candy recipie and it was a huge hit.
    I have requests to make more of the candy.

    Reply
  75. jason aka earthwulf

    Dec 18, 2014 at 11:32 am

    Did this for my daughter’s b-day last May, and it worked perfectly. I also did a vid (not the best quality, but…) of how to test/make the glass using your recipe. It’s… gotten quite a few hits. I wanted to say thank you; I did credit this page, so I’m hoping it sent people here!

    http://youtu.be/9-AbRLwWnp0

    Reply
    • Teresa

      Jan 25, 2015 at 3:04 pm

      When we make our hard candy we finally figured out that altitude and dry rainy days matters.I would recommend
      That after we make it we store it in a ziplock bag,, with powdered sugar and also once you pour the sugar on to the cookie sheet tap it lightly on the counter to bring any air bubbles to the top of the candy to help give you a good side.

      Reply
  76. Randi

    Aug 22, 2015 at 10:30 am

    My daughter loved the frozen cake I made for her birthday but the only problem was I couldn’t get the blue candy to harden. Would it have been easier if I just used jolly ranchers?

    Reply
  77. Nejka

    Apr 3, 2016 at 4:23 pm

    Thank you so much for this great cake tutorial. I’m really not a good baker at all and my daughter wanted a frozen cake. After searching the web, I decided yours looks the best and something I might be possibly able to pool it off. It was perfect!! Just like your cake! But with the sugar glass, we only used sugar, water and colouring and made toffee as we call it and was perfect. Everyone was impressed by my skills;) thank you, you saved my day. Greetings from Australia x

    Reply
    • Rachel Rockwell

      Apr 3, 2016 at 8:43 pm

      thanks so much, Nejka! Glad it worked out! 🙂 I would love to see a pic if you have one, too. [email protected]

      Reply
  78. Edith

    Oct 12, 2016 at 6:16 pm

    Do you mind if I quote a few of your posts as long as I provide credit and sources back to your blog?
    My website is in the very same area of interest as yours and my
    users would really benefit from some of the information you provide here.
    Please let me know if this okay with you. Thanks a lot!

    Reply
  79. Laura

    Aug 31, 2018 at 6:11 am

    I used the rock candy recipe for a frozen cake I did a couple years ago. It was great! The candy did have a little of a greenish tint, but no one complained! I am doing the same thing in a couple days, but now it’s Wizard of Oz and I’m using it to make the Emerald City! Wish me luck!

    Reply
  80. Aylor

    Dec 9, 2019 at 4:52 am

    When I was a school studentI wondered exactly how one needs to handle this issue but I’d always come across some questionable answers: go Google it or even ask a buddy.
    What if my friends don’t have enough knowledge or expertise
    to help me? What when I googled it multiple times and could not locate the answer?
    That’s when posts like this one can give appropriate advice on the matter.

    Once again, thank you for the job!

    Reply
  81. Cake Mold

    Jun 17, 2020 at 7:09 am

    What a fascinating Ice cream cake, and indeed, the Disney frozen theme is working as a cherry on the cake. My little doll (I mean my daughter)’s birthday is coming this weekend, and I will try this for her. Thank you for sharing!

    Reply

Trackbacks

  1. Disney FROZEN Party!!! - Bubbly Nature Creations says:
    Dec 18, 2013 at 3:00 am

    […] […]

    Reply
  2. Disney Frozen Ice Cream Cake | Ciao Annie says:
    Feb 9, 2014 at 9:46 pm

    […] you find an idea that is so fantastic, there aren’t many improvements to make! Thanks Bubbly Nature Creations for such amazing […]

    Reply
  3. Frozen Ice Candy Cake | Garden Seeds and Honey Bees says:
    Mar 6, 2014 at 8:16 am

    […] You can see similar decorated cake and Blue Ice Candy at Bubbly Nature Creations […]

    Reply
  4. Christa Cakes | color-me-whimsy says:
    Mar 7, 2014 at 3:34 pm

    […] made the blue ice candy following these instructions, only doing a half recipe.  It was easier than I thought it would be and the final result was […]

    Reply
  5. How To Mold Sugar Candy Using Cookie Cutters | Crafted by Lindy says:
    Mar 27, 2014 at 7:01 am

    […] for the “snowflake” that Elsa is standing on. I saw a post on making Ice Candy on Bubbly Nature Creations and loved the way the sugar candy looked like ice. I knew I wanted to do something with sugar candy […]

    Reply
  6. Frozen bday party ideas! | Ramblings & Thoughts says:
    Mar 31, 2014 at 9:52 am

    […] off, the blue-green “Ice” hard candy…looks really cute on this website’s cake, but I boiled mine for an extra 17 seconds and it burned a little…it was still edible though! […]

    Reply
  7. Receita do bolo “Frozen” – Let it go, Let it go…. | Discovering Houston says:
    Apr 7, 2014 at 10:29 am

    […] são dos melhores. Encontrei então um site muito legal com um bolo lindo, que você encontra aqui, com a receita original em inglês. Adaptei a receita e ……tchan tchan tchan tchan, eis […]

    Reply
  8. Disney Frozen Cake Fail | CraftFail says:
    May 5, 2014 at 10:01 am

    […] costumes, and – above all – Disney Frozen-themed birthday parties complete with a Disney Frozen cake like this gorgeous one by Bubbly Nature […]

    Reply
  9. 25 Frozen Inspired Party Ideas, Crafts, Activities and Recipes says:
    May 9, 2014 at 11:58 am

    […] hosted the most amazing Frozen party for her family and friends. I especially love her ice cream cake which reflects the movie so […]

    Reply
  10. Amazing ideas for Frozen movie party recipes - Cool Mom Picks says:
    May 14, 2014 at 1:58 pm

    […] a little bigger and grander than bite-sized treats, you have to check out this outrageous Frozen Ice Cream Cake from Bubbly Nature Creations. This birthday cake is the pièce de resistance for any Frozen movie […]

    Reply
  11. 28 Disney-Inspired Recipes You Have To Try - Juicy Shares Daily says:
    Aug 30, 2015 at 9:27 am

    […] bubblynaturecreations.com […]

    Reply
  12. 28 Disney-Inspired Recipes You Have To Try - Ice Trend says:
    Aug 31, 2015 at 11:46 am

    […] the recipe at Bubbly Nature Creations […]

    Reply
  13. Expectativa X realidade: 20 das piores tentativas de copiar bolos says:
    Apr 3, 2017 at 7:37 am

    […] Foto: craftfail,sprinklesomefun […]

    Reply
  14. 24 Fun Themed Kids Birthday Cake Ideas - Ideal Me says:
    Jul 22, 2017 at 4:31 am

    […] Via Sprinkle Some Fun […]

    Reply
  15. Bolo Frozen 50+ Ideias Lindas e Divertidas – Bolo Decorado says:
    Mar 9, 2019 at 7:50 am

    […] Frozen) (Reprodução/Bolo Decorado da Frozen) (Reprodução/Bolo Decorado da Frozen) (Reprodução/Bolo Decorado da Frozen) (Reprodução/Bolo Decorado da Frozen) (Reprodução/Bolo Decorado da Frozen) (Reprodução/Bolo […]

    Reply
  16. Sainsbury's Frozen Cake Decorations - The Cake Boutique says:
    Nov 2, 2019 at 7:45 am

    […] Download Image More @ sprinklesomefun.com […]

    Reply

Leave a Reply Cancel reply

Your email address will not be published. Required fields are marked *

Recipe Rating


This site uses Akismet to reduce spam. Learn how your comment data is processed.

Primary Sidebar

RachelHi Friends! I’m Rachel. Lover of Jesus, my family, late nights, coffee, READ MORE…

Search

Site Footer

Sprinkle Some Fun is a participant in the Amazon Services LLC Associates Program, an affiliate advertising program designed to provide a means for sites to earn advertising fees by advertising and linking to amazon.com.

Copyright © 2021 Sprinkle Some Fun · All Rights Reserved ·