
One of my fondest Christmas memories happened the first year my husband and I were married. He knew how much I loved Christmas and wanted to surprise me by getting a Christmas tree. Boy did he ever and it was HUGE! It barely fit in the little duplex that we were renting. It was the sweetest thing ever and whenever I see a Christmas tree I still think of the moment he surprised me.
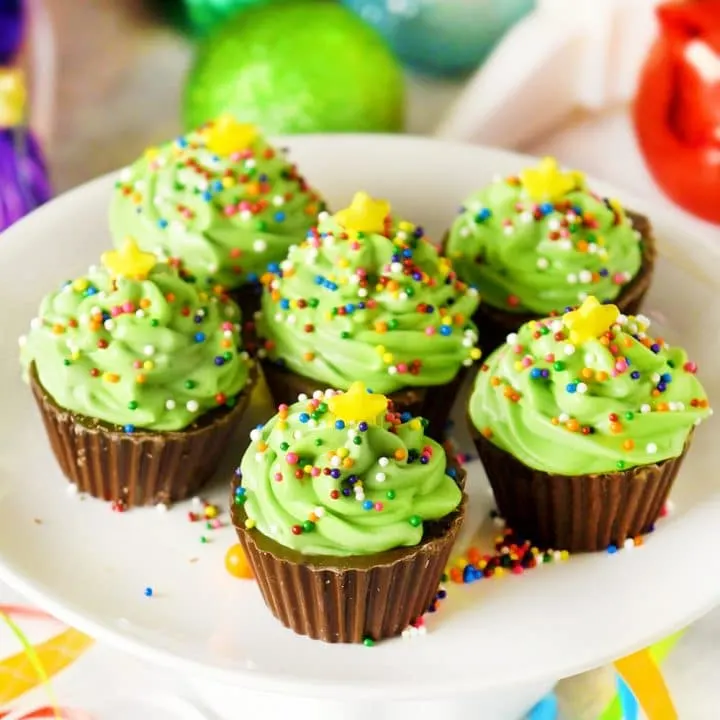
Christmas Tree Cheesecake Mousse Cups look just like a Christmas Tree with all the trimmings and even a little star on top.
This post has affiliate links.


Not only are these mousse cups absolutely cute, but they are also delicious! The cheesecake mousse always gets rave reviews from everyone that tries it. It’s so luscious and creamy and tastes great inside the chocolate cups. My favorite way to eat them is just to eat off the tops and then eat the chocolate cup. Tastes so good!


I know it’s hard to tell from the pictures, but these are bite sized treats. You don’t even need utensils to eat them. The chocolate cups are around the size of a mini Reese’s peanut butter cup to give you a better idea of how big they are. I tried using bigger sprinkles on these, but the small ones look the best.


With the sprinkles and candy star on top it really makes these Christmas Tree Cheesecake Mousse Cups look festive. It’s always fun to change up the colors of the trees too. Make pink, white or really any color tree that you want! We also like to make some with traditional colors like green, white and red.


The chocolate cup that holds the cheesecake mouse is made from melting chocolate that I formed in a pre-made mold. It was really easy to use, but the plastic is a little flimsy. I suggest a mold made form silicone for ease of use. Try this one from Amazon (affiliate). I use molds from this same company with great results.


The recipe I made calls for Jello Cheesecake Pudding. I’ve heard that the cheesecake flavor is not at every store. It’s fine to use white chocolate pudding mix or a vanilla pudding mix if you can’t find the cheesecake flavor. Make sure whatever pudding you use is the regular sized box and not family size.


Tips on making these cute Christmas Tree Treats:
- Make the mousse ahead of time and refrigerate for best results. The mousse mixture gets thicker over time and with cooler temperatures. You can make these and eat them right away, but they stand up even better if the mousse is chilled before piping.
- My suggestions for cute star sprinkles: Gold stars from Amazon or these Yellow stars from Amazon (affiliate links).
- Tips for making chocolate dessert cups. Use chocolate almond bark or melting chocolate wafers to make your dessert cups. These are both made for melting into various shapes and will work the best. Use a dessert cup mold between 1 to 1 1/2 inches in diameter. Any bigger than that and it will be hard to form the Christmas tree shape inside the cups.


These cute treats are perfect to whip up anytime you need a Christmas themed treat. Christmas tree cheesecake mousse bites should last around an hour sitting out or up to 24 hours covered in the refrigerator. The cheesecake mousse is a milk product and so you’ll want to refrigerate any leftovers for up to a day.
Have the kids help decorate the mousse trees and pick out their own sprinkles. My kids are not big fans of cheesecake, but this cheesecake mousse is a favorite of theirs. It’s not a really strong cheesecake taste and the pudding has a unique flavor we all love. It’s amazing with the chocolate too.


We like to eat these by hand or serve them on a plate with little mini spoons. No matter how you eat them, Christmas Tree Cheesecake Mousse Cups make an adorable addition to any Christmas dessert table! They are sure to be a favorite Christmas treat!
If you love this recipe for Christmas Tree Cheesecake Mousse Cups then please give us a five star review below!
Be sure to follow me on social media so you never miss a post!
Facebook | Pinterest | Instagram
No Bake Christmas Tree Cheesecake Mousse Cups

Christmas Tree Cheesecake Mousse Cups look just like a Christmas Tree with all the trimmings and even a little star on top.
Ingredients
- 16 oz. cream cheese softened
- 1 box cheesecake pudding mix (do not make), can substitute vanilla or white chocolate
- 2/3 cup heavy cream
- 1 cup powdered sugar
- green or other color food coloring for trees
- piping bag with a large star tip
- sprinkles
- small star sprinkles or candies
For Chocolate Cups:
- 1 package chocolate almond bark or milk chocolate melting wafers
- 1 bite sized candy cups mold
Instructions
- Chocolate Cups: The first step is to make the chocolate cups because they will need to harden before using them. Melt the chocolate according to package directions and spoon a little into your chocolate mold. Make sure to "paint" around the sides of the mold so that it forms a cavity in the middle and completely covers the sides.
- Freeze to harden around 10 minutes or so and then un-mold. Make the cheesecake filling as directed below to fill them.
- For the cheesecake filling: Add cream cheese first and beat well on high for a minute. Next, add the cheesecake pudding mix and keep beating. Slowly add the heavy cream and powdered sugar until it's all mixed in. Add the food coloring until you achieve the color you want, but no more than 1 tsp. to make sure it doesn't thin out the filling too much.
- At this point I suggest putting the mixture into the refrigerator for an hour which will help to thicken the filling or use the filling right away. Either way is fine, but your trees will be able to be taller if you let the mixture thicken in the refrigerator.
- Put the mixture into a piping bag fitted with a large star tip and fill each chocolate cup making swirling motions that get smaller as you go up to make the Christmas tree shape. Add sprinkles and stars. You can serve these right away or refrigerate (suggested) for 1 hour to help them set them up even more. Enjoy!
Notes
This chocolate mold from Amazon (affiliate) is a good size for these.
I use this large star tip seen here for piping. (affiliate)
Nutrition Information
Yield
24Serving Size
1 gramsAmount Per Serving Unsaturated Fat 0g
bàn ghế cafe
Wednesday 17th of November 2021
This is really a great article I really like and will definitely share it widely with my friends, wish you always have good health and make more articles in the future. thank you
Cheryl
Friday 14th of December 2018
Approximately how many does this recipe make? I'm trying to figure out how many molds I would need. Thanks
Rachel
Friday 14th of December 2018
If you use a mini sized molds then it will be around 20 to 24.